Install the Excel Add-In
Install with the Generated Installer
Note: The client installer installs under user's local profile which does not require administrative privileges. |
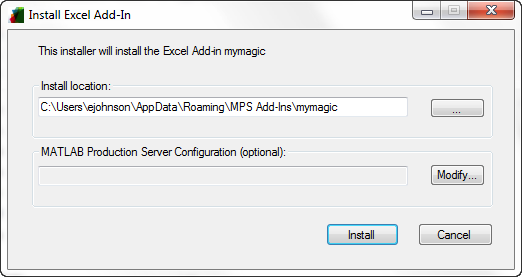
The Production Server Compiler app generates an installer that you use to install the add-in and configure it to connect to a MATLAB® Production Server™ instance.
To install the add-in:
Locate the installer in the
for_redistribution\clientfolder.Double click the installer to start it.

In the Install location field, enter the location where the Excel® add-in is installed.
Specify the URL of the deployable archive powering the Excel add-in.
Click Modify.

In the Host field, enter the host name or the full URL of the machine running the MATLAB Production Server instance with the deployable archive.
In the Port field, enter the port number on which the server instance listens for incoming requests.
The default port number is
9910.Click Save.
Click Install.
Install with the Raw Files
In the client\for_redistribution_files_only you
will find the following files:
projName.dllprojName.basprojName.xlaNote: If
projName.xlaprojName.basserverconfig.dll- Excel add-in that manages the server configuration
On the machine running the add-in, you must register the following
DLLs with the regAsm /codebase command:
mymagic.dllserverconfig.dll
If mymagic.xla is generated, install the
add-in into Excel. If not, import mymagic.bas to
the workbook's Visual Basic project.
Note:
If you do not have administrative privileges on the machine,
you can run |