At the beginning, the database directory is empty, you will need to import the raw data in this new database in order to process them. The importation is done via importation processes that take the data to import and information about it as input. Then the importation process copies the raw data in BrainVISA database directory at the place defined in BrainVISA ontology according to the information given by the user.
Once the data is imported, a lot of search tools are available to easily retrieve it and select it as input parameter of processing tools.
There are several importation processes according to the type of data. Some of these processes are grouped in Data Management toolbox -> Import. You can also usually find these processes in each toolbox in an Import category.
Let's look at the following example, for importing a T1 weighted image:
Go to the following process: Data management -> import -> T1 MRI -> Import T1 MRI
Open the process:

Select a T1 weighted image file for importation, using the icon

To configure the output file, click
 . The following window will come up:
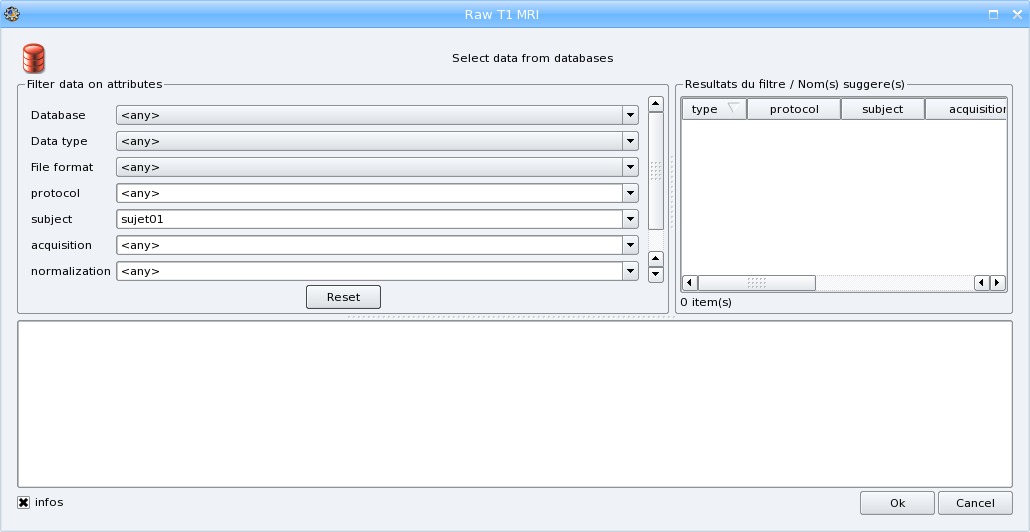
Select the different attributes values:
- choose a database if you have several databases activated,
- select the format if you want to convert the input file to another format,
- enter a new protocol name (the combo box is editable so you can type a new value) or select an existing one
- Enter the subject identifier, the default value is the name of the input file
- The other parameters are optional: you can change the value of acquisition if you want or indicate if the image is normalized or not.
When all needed parameters values are set, BrainVISA suggests a value for the output parameter (data that will be written in the database):

Click the OK button. You have returned to the process window and the Input and Output fields have been completed. If your T1 MRI is an ANALYZE volume, select convention (radiologic or neurologic) in Input_spm_orientation.

Click Run to start the importation process. During this process, your files will be converted to the NIFTI format (.nii). At the end of the process, a t1mri folder will have been created in data_directory/protocol/subjet. It will contain the imported file.
When you have to import a lot of data, it is practical to use iteration feature. See the section about iterations.
In this example, we're going to import 3 T1 MRI using iterations.
Go to the following process: Data management -> import -> T1 MRI -> Import T1 MRI.
Right-click on it and select Iterate in the contextual menu. The iteration dialog appears :

Select a T1 weighted image file for importation, using the icon
A new dialog showing the list of currently selected files opens. It enables to select the other input files which could be in different directories by clicking again on
in this dialog. It is also possible to remove files from the list using the Remove button or to change the order of the input files using the arrows buttons.
Select a T1 weighted image file for importation, using the icon
To configure the output file, click
. The following window will come up:Select the different attributes values. When an attribute has the same value for all outputs, you can enter only one value. If the value is different for each output, enter all the values separated by a space. Be careful to give the parameters values in the same order as the input files.
- choose a database if you have several databases activated,
- select the format if you want to convert the input files to another format,
- enter a new protocol name (the combo box is editable so you can type a new value) or select an existing one,
- Enter the list of subject identifiers, with a blank character between each subject name.
- The other parameters are optional: you can change the value of acquisition if you want or indicate if the image is normalized or not.
When all needed parameters values are set, BrainVISA suggests the values for the output parameter (data that will be written in the database):

Select all the values and click the OK button. You have returned to the iteration dialog and the Input and Output fields have been completed.

Click on the ok button to generate the iteration process. A new process window appears, it is a pipeline composed of 3 Import T1 MRI steps, one for each input file.

Click Run to start the iteration process. Each importation process will be executed.

When you get images from an MRI scanner, they often are in Dicom format. It is possible to import such images but they will be converted to another format because BrainVISA generally doesn't use directly Dicom images in processes. The way Dicom images are written depends on the scanner and this heterogeneity makes it difficult to have a unique way of importing Dicom images.
In this part, you will find a few hints about how to use Dicom images in BrainVISA.
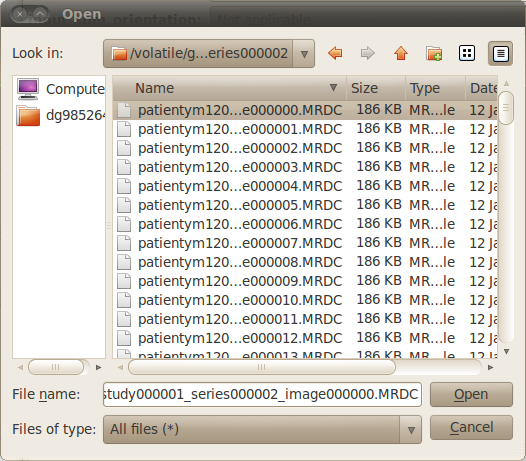
BrainVISA package includes a tool to read and convert Dicom images. So if a Dicom image can be correctly visualized with Anatomist, it should also be converted correctly to other formats. In this case, you can directly use an importation process, for example the Import T1 MRI process if the image is a T1 MRI.
Select the first file of the Dicom serie as input parameter. You may have to change the file filter to All files (*) in the file browser to see the Dicom files if they haven't the extension .dcm. Data will be converted to GIS or Nifti format in BrainVISA database.
Sometimes, BrainVISA internal Dicom reader and converter may not be able to read your data because of Dicom format heterogeneity. In this case, you can try to use other software to convert Dicom to another format. Here are a few external software that can be used for Dicom conversion:
MRICron (dcm2nii)
MRIConvert
XMedCon
In some cases, dcm2nii tool may create a Nifti file per slice. Then it is possible to get a 3D Nifti file using the command AimsZCat, which is included in BrainVISA package.
If MRICron dcm2nii tool is installed on your computer, the converter Tools -> converters -> Dicom to Nifti Converter Using MRICRON will be available in BrainVISA. This converter uses dcm2nii tool but can be easier to use with BrainVISA graphical user interface. If this tool is available, you also will be able to use a specific importation process for Dicom T1 MRI: T1 MRI -> import -> Import Dicom T1 MRI which enables to select a directory containing the Dicom files as input. Then it converts the Dicom data using dcm2nii before importing the data.