The tutorial covers the following topics:
Once you have learned how to define an animated demo sequence, you can further learn how to record the demonstration into a movie file in Section "Creating movie files".


| Figure 437: Data chocolate-bar.am with a Bounding Box and an Ortho Slice |
Now let us animate this slider using the Animation Director
module as our first exercise. From the toolbar, click on the ![]() Animation Director button.
Animation Director button.
A new widget becomes visible hosting the Animation Director user interface.

| Figure 438: Animation Director user interface |
Like the other widgets, this widget is also dockable and you can place it at a convenient position within the user interface.
After activating the Animation Director by clicking on the related button in the toolbar, all ports of the currently available modules that can be animated are extended by an additional button representing a stopwatch  .
.
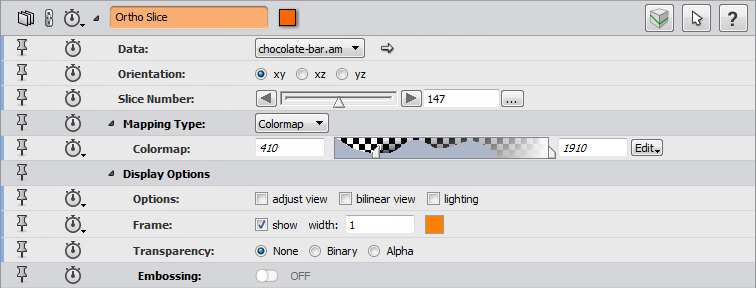
| Figure 439: Extended ports in the module's properties |
Before we start animating the Ortho Slice' slice position, let's first have a quick look at some GUI elements of the Animation Director widget (shown below in figure: event and keyframe in timeline).
As you can see, the user interface is divided into a left and a right panel. On the left panel, you can control the timeline that is displayed on the right panel. The timeline has a main time slider. The name of the current animation can be changed by writing directly into the current animation name field. For example, we can name it "CandyAnimation".
We can now animate the Ortho Slice' slice position. We do this by clicking on the stopwatch button of the Slice Number port in order to schedule the start event:

| Figure 440: extended Slice Number port |
Clicking on the stopwatch button creates a new keyframe in the Animation Director timeline and the event is listed in the left panel of the user interface. If you hold the mouse cursor above the small orange diamond symbol  in the timeline panel, this will activate a small input field where you can adjust the time and the accompanying value for the port with which it is associated. In order to adjust the schedule, you can simply drag the diamond icon to the desired position on the timeline.

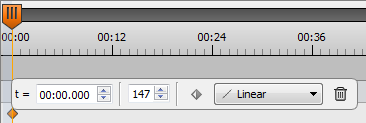
| Figure 441: event and keyframe in timeline |
With this operation, we have defined the beginning of the animation of the slice position. Next we want to define the time where the animation should end. To do this, we drag the master time slider  to the desired time on the timeline, e.g., to 00:04.000, which means 4 seconds. As a next step, we set the slice position of the Ortho Slice module by either setting the Slice Number port in the properties of the module or by positioning the slice interactively in the viewer window. Using either method, set the value of the Slice Number port should be set to 294. After you click the stopwatch button again, the keyframe is created in the timeline:

| Figure 442: start event keyframe and end stop event keyframe in timeline |
You can test your first animation by positioning the master time slider back to 00:00, either by clicking on the  Jump To Start button or by entering the desired time into the Current Time control
  . Finally, start the animation by clicking on the
  Play Forward button or by pressing [F4]. To stop the animation click on the
  Stop button or press [F3].
Note: The animation time is not a real physical time. The time that has been specified is the time that will try to respect, if possible. If an animated property needs a specific amount of time to be processed (computation, viewer redraw, etc.), will not skip it and will wait until the animation step has finished before continuing. This implies that, for instance, an animation with a time range of 30 seconds won't run for exactly 30 seconds, but will run 30 seconds or longer.
As an exercise, adjust the master time slider to the time 00:12, set the position of the Slice Number of the Ortho Slice to the value 0, and click the stopwatch button again. This will create another keyframe in the timeline. Restart the animation again as described above. The slice should first move from slice number 147 up to 294 during 4 seconds and then decrease down to the value 0 within the next 8 seconds.
Note: As described above, you can edit the time and the value of single keyframes by hovering the mouse cursor above the keyframe icon and by clicking in its user interface after it has been become visible (hover dialog box). Alternatively, you can modify the time of the keyframe by dragging it on the timeline. In order to change the value of the associated port, you can position the master time slider on the time of the keyframe and then adjust the value of the port by using the user interface in the properties area of the module. In order to shift all keyframes of a port forwards or backwards on the timeline, position the mouse cursor between two subsequent keyframes. You will notice a connecting bar in dark gray and that all keyframes of this sequence are selected (indicated by orange colored diamonds).
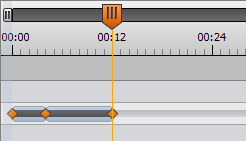
| Figure 443: shifting subsequent keyframes |
You can now shift all selected keyframes forwards or backwards by dragging the dark gray bar.
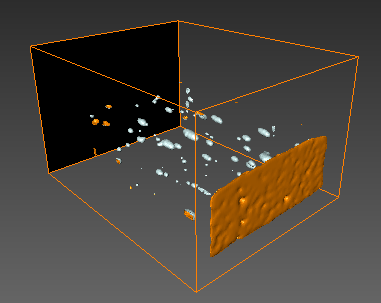

| Figure 444: Viewer and Network when you visualize Ortho Slice and Surface View modules |
If you want to switch the surface visualization on and off manually, you would use the viewer toggle (orange rectangle) of the Surface View module. If you want to include this action in your animation sequence, you need to do the following:

| Figure 445: Surface View stopwatch and toggle buttons |
To test the newly added event, set the master time slider of the Animation Director back to the beginning by using one of the methods described above. As you have may noticed, another event has been automatically added at time 00:00 to consider the surface model as invisible by default. Start the animation. As before, the slice moves back and forth. When the master time slider reaches 00:12, the surface model is switched on (Click to load the project).
Note: You can change the time when the Surface View becomes visible by simply dragging the appropriate keyframe diamond on the timeline.
Once you are satisfied with the camera rotation, add it to the timeline:
Now play the demo to see the result. After moving the slice and switching on the surface model, the view is rotated so that the surface can be seen from all sides (Click to load the project).
 to remove the keyframe.
To remove all keyframes that are associated with a module's port, you can click on the trashcan  that is located in the same line as the port name on the left panel.
Like we did with the inside surfaces model, we can switch on the outer surface model at some point in the animation sequence:
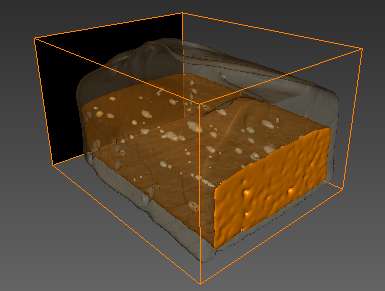

| Figure 446: Viewer and Network with an Ortho Slice and two Surface Views |
Again, check out the results by playing the animation sequence. (Click to load the project).
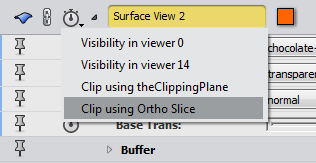

| Figure 447: selecting Clip using Ortho Slice and enabling the clipping in the timeline |
In order to make the outer surface visible, we finally must animate the Ortho Slice towards the bottom of the scene:
Start the animation either from the beginning or from 00:14 and watch the result.
As a last step, you might want to rotate the view again while the outer surface is appearing. You can simply reuse the old camera rotation during a second time range:
To avoid the Ortho Slice to hide the surface view when displaying the slice 294, you can change its Transparency mode during the animation.


| Figure 448: Changing the Ortho Slice Transparency mode |
Start the animation either from the beginning or from 00:14 and watch the result.
However, you can simply invert the orientation of the clipping in Animation Director. In our example, you would simply set the master time slider to a time prior to the actual clipping. Next, you need to select the module that will do the clipping, the Ortho Slice module in our case. Now, click on the topmost stopwatch icon in the Ortho Slice properties area and select Invert clipping orientation from the drop-down list.
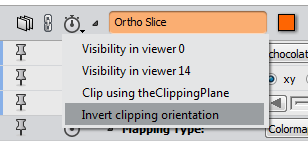
| Figure 449: How simply invert the orientation of the clipping in Animation Director |
You do not need to use an Ortho Slice module to do clipping. As you may have observed, the Ortho Slice might occlude parts of what you want to show. In that case, it is better to create an empty Clipping Plane module by selecting Other / Clipping Plane from the Project / Create Object... menu. Attach the module to the data set you want to clip (e.g., to chocolate-bar.surf in our example), and then use the Clipping Plane for clipping just as you used the Ortho Slice before.
To take this into account, you can insert breaks in the Animation Director timeline. Let us insert one such break right after the inside model appears:
 Add Break from the drop-down list. A new keyframe is created on top of the timeline indicating the Break.
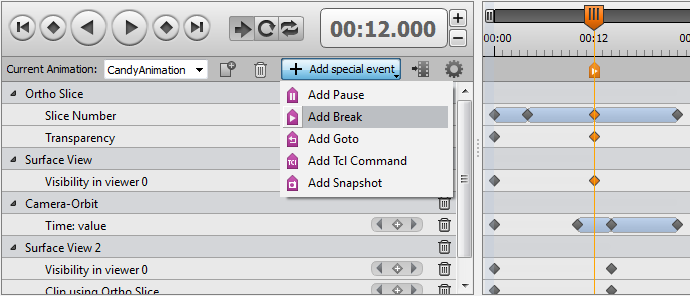
| Figure 450: Add break in a Animation Director |
This way the animation will stop at time 00:12, which is right when the model is switched on. When you play the animation from the start, you will notice that after the inner structure is switched on, the animation will stop.
Let us insert a second break at time step 00:14, which is right before the outer surface is starting to show. Proceed as above, using a trigger time of 00:14 instead of 00:12 (Click to load the project).
If you run the animation from the very beginning, it will stop after the inside surfaces are displayed. Click on the Play Forward button or press [F4] to continue the animation.
Try this by pressing the function key [F4]. The demo continues.
Likewise, the animation will stop just before showing the outer surface. Again, you can continue the demo by pressing [F4]. In general, at any point while the animation is running, you can press the [F3] key to stop it manually. Pressing [F4] will continue from the point where the animation stopped.
If you have defined breaks as we did above, there are two additional function keys that in a sense allow you to navigate through the animation segments: pressing [F9] will jump back to the previous break or to the very beginning of the animation, and [F10] will jump to the next break, or to the very end of the animation.
Note: If you use [F9/F10], it will just jump, and you need to press [F4] to start playing it from the new time step.
Please note that you can disable the breaks by checking the Skip Break toggle in the More Options panel of the Animation Director module. You may even disable the definition of function keys by checking the No toggle in the Activate Function Keys port:
| Figure 451: Disabling Breaks and Function Keys |
You can toggle the appropriate button  Play Once,
  Play Loop, or
  Play Swing located right between the main VCR button like Play, and the main time control:

| Figure 452: Loop options: Play Once, Play Loop, or Play Swing |
Now if you play the animation, it will play from beginning to end once (Play Once), start over from the beginning (Play Loop), or play forwards, backwards, and so on (Play Swing).
However, you may want to define some part of the demo to run in a loop, and then stop the loop and continue with the animation upon key press. You can easily do this with the Goto feature of the Animation Director module:
 Add Goto from the drop-down list. A new keyframe is created on top of the timeline.
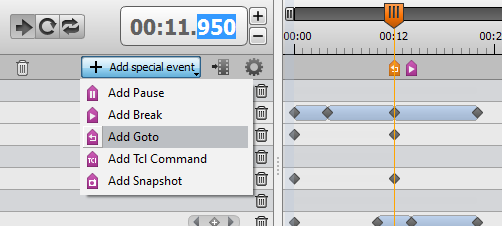

| Figure 453: Goto, jump to user-specified time |
When you run the animation sequence now, it will loop in the segment between time 00:04 and 00:12, only showing the Ortho Slice move up, jump down, move up again and so on... You can stop this by clicking on the stop button of the Animation Director control panel or by pressing [F3]. To continue after the loop, you need to jump to the next segment by pressing [F10], and then start playing again by pressing [F4].
When you load the project back into , the state of the project will be the same as it was when you saved it. This means that you should be careful to reset the Animation Director master time slider to 00:00 before saving the project if you want the demo to start from the beginning.
After loading the project, you can start the demo by clicking on the play button of the Animation Director module, or by pressing [F4]. If you want to run the demo automatically right after the project is loaded, you can use the auto start feature that you find when you check Activate Auto Start in the More Options panel.
| Figure 454: Enable auto start mode |
Just activate the Activate Auto Start functionality by checking the Yes radio button and save the project. When you load it again, the demo will start running automatically.