End-to-End Deployment of MATLAB Function
If you are still in the process of developing a MATLAB® function that is not yet ready to be deployed, you may find this example to be an appropriate introduction to using MATLAB Compiler™ for Excel® add-ins.
The Function Wizard allows you to iteratively test, develop, and debug your MATLAB function. It does this by invoking MATLAB from the Function Wizard Control Panel.
Developing your function in an interactive environment ensures that it works in an expected manner, prior to deployment to larger-scale applications. Usually, these applications are programmed by the Excel Developer using an enterprise language like Microsoft® Visual Basic®.
Similar to the Magic Square example, the Prototyping and Debugging
example develops a function named mymagic, which
wraps a MATLAB function, magic, which computes
a magic square, a function with a single multidimensional matrix output.
If your MATLAB function is ready to be deployed and you have already built your add-in and COM component with the Deployment Tool, see Execute Functions and Create Macros.
Key Tasks for the MATLAB Programmer
| Task | Reference |
|---|---|
| 1. Review MATLAB Compiler for Excel add-ins prerequisites, if you have not already done so. | MATLAB Compiler for Microsoft Excel Add-In Prerequisites |
| 2. Prepare to run the example by copying the example files. | Example File Copying |
| 3. Test the MATLAB function you want to deploy as an add-in or COM component. | mymagic Testing |
| 4. Install the Function Wizard. | Installation of the Function Wizard |
| 5. Start the Function Wizard. | Function Wizard Start-Up |
| 6. Select the prototyping and debugging workflow. | Workflow Selection for Prototyping and Debugging MATLAB Functions |
| 7. Define the new MATLAB function you want to prototype by adding it to the Function Wizard and establishing input and output ranges. | New MATLAB Function Definition |
| 8. Test your MATLAB function by executing it with the Function Wizard. | Function Execution from MATLAB |
| 9. Prototype and Debug the MATLAB function if needed, using MATLAB and the Function Wizard. | MATLAB Function Prototyping and Debugging |
| 10. Create the add-in and COM component, as well as the macro, using the Function Wizard to invoke MATLAB and the Deployment Tool. | Microsoft Excel Add-In and Macro Creation Using the Function Wizard |
| 11. Execute the your function from the newly created component, to ensure the function's behavior is identical to when it was tested. | Function Execution from the Deployed Component |
| 12. Execute the macro you created using the Function Wizard. | Macro Execution |
| 13. Package your deployable add-in and macro using the Function Wizard to invoke MATLAB and the Deployment Tool. | Microsoft Excel Add-In and Macro Packaging using the Function Wizard |
| 14. Optionally inspect or modify the Microsoft Visual Basic code you generated with the COM component. Optionally, attach the macro you created to a GUI button. | Microsoft Visual Basic Code Access (Optional Advanced Task) |
What Can the Function Wizard Do for Me?
The Function Wizard enables you to pass Microsoft Excel (Excel 2000 or later) worksheet values to a compiled MATLAB model and then return model output to a cell or range of cells in the worksheet.
The Function Wizard provides an intuitive interface to Excel worksheets. You do not need previous knowledge of Microsoft Visual Basic for Applications (VBA) programming.
The Function Wizard reflects any changes that you make in the worksheets, such as range selections. You also use the Function Wizard to control the placement and output of data from MATLAB functions to the worksheets.
Note:
The Function Wizard does not currently support the MATLAB |
Example File Copying
All MATLAB Compiler examples reside in matlabroot\toolbox\matlabxl\examples\
| For Example Files Relating To... | Find Example Code in Folder... | For Example Documentation See... |
|---|---|---|
| Magic Square Example | xlmagic | Integrate an Add-In and COM Component with Microsoft Excel |
| Variable-Length Argument Example | xlmulti | Work with Variable-Length Inputs and Outputs |
| Calling Compiled MATLAB Functions from Microsoft Excel | xlbasic | Calling Compiled MATLAB Functions from Microsoft Excel |
| Spectral Analysis Example | xlspectral | Build and Integrate Spectral Analysis Functions |
mymagic Testing
In this example, you test a MATLAB file (mymagic.m)
containing the predefined MATLAB function magic.
You test to have a baseline to compare to the results of the function
when it is ready to deploy.
In MATLAB, locate
mymagic.mmymagic.m. See Example File Copying for locations of examples. The contents of the file are as follows:function y = mymagic(x) %MYMAGIC Magic square of size x. % Y = MYMAGIC(X) returns a magic square of size x. % This file is used as an example for the MATLAB Compiler product. % Copyright 2001-2012 The MathWorks, Inc. y = magic(x)
At the MATLAB command prompt, enter
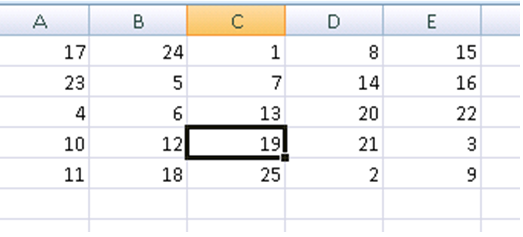
mymagic(5). View the resulting output, which appears as follows:17 24 1 8 15
23 5 7 14 16
4 6 13 20 22
10 12 19 21 3
11 18 25 2 9
Installation of the Function Wizard
Before you can use the Function Wizard, you must first install it as an add-in that is accessible from Microsoft Excel.
After you install the Function Wizard, the entry MATLAB Functions appears as an available Microsoft Excel add-in button.
Using Office 2010 or Office 2013
Click the File tab.
On the left navigation pane, select Options.
In the Excel Options dialog box, on the left navigation pane, select Add-Ins.
In the Manage drop-down, select Excel Add-Ins, and click Go.
In the Add-Ins dialog box, click Browse.
Browse to
matlabroot/toolbox/matlabxl/matlabxl/archFunctionWizard2007.xlam. Click OK.In the Excel Add-Ins dialog, verify that the entry MATLAB Compiler Function Wizard is selected. Click OK.
The Home tab of the Microsoft Office Ribbon should now contain the Function Wizard tile. See The Home Tab of the Microsoft Office Ribbon with Function Wizard Installed.
Using Office 2007
Start Microsoft Excel if it is not already running.
Click the Office Button (
 )
and select Excel Options.
)
and select Excel Options.In the left pane of the Excel Options dialog box, click Add-Ins.
In the right pane of the Excel Options dialog box, select Excel Add-ins from the Manage drop-down box.
Click Go.
Click Browse. Navigate to
matlabroot\toolbox\matlabxl\matlabxl\archFunctionWizard2007.xlam. Click OK.In the Excel Add-Ins dialog box, verify that the entry MATLAB Compiler Function Wizard is selected. Click OK.
Using Office 2003
Select Tools > Add-Ins from the Excel main menu.
If the Function Wizard was previously installed, MATLAB Compiler Function Wizard appears in the list. Select the item, and click OK.
If the Function Wizard was not previously installed, click Browse and navigate to
matlabroot\toolbox\matlabxl\matlabxlfolder. SelectFunctionWizard.xla. Click OK to proceed.
Function Wizard Start-Up
Start the Function Wizard in one of the following ways. When the wizard has initialized, the Function Wizard Start Page dialog box displays.
Using Office 2007 or Office 2010 or 2013
In Microsoft Excel, on the Microsoft Office ribbon, on the Home tab, select Function Wizard.
The Home Tab of the Microsoft Office Ribbon with Function Wizard Installed

You can also access Function Wizard from the File tab.
Select File > Options > Add-Ins from the Excel main menu.
Select Function Wizard.
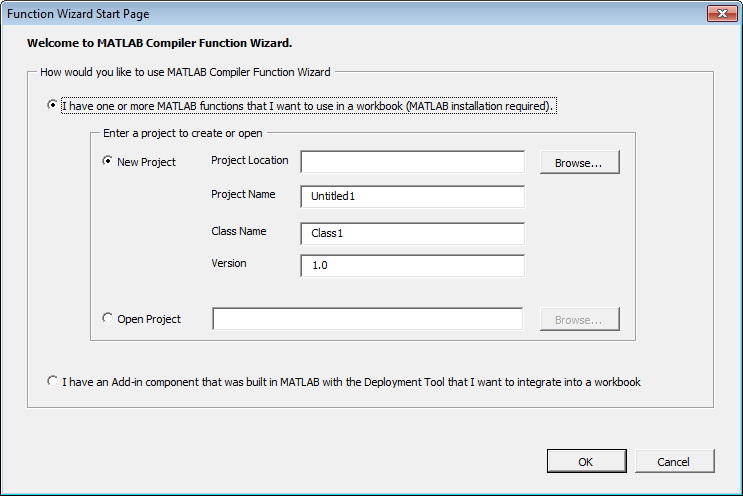
The Function Wizard Start Page Dialog Box
Workflow Selection for Prototyping and Debugging MATLAB Functions
After you have installed and started the Function Wizard, do the following.
From the Function Wizard Start Page dialog box, select I have one or more MATLAB functions that I want to use in a workbook (MATLAB installation required). The New Project option is selected by default. Enter a meaningful project name in the Project Name field, like
testmymagic, for example.Tip Some customers find it helpful to assign a unique name as the Class Name (default is
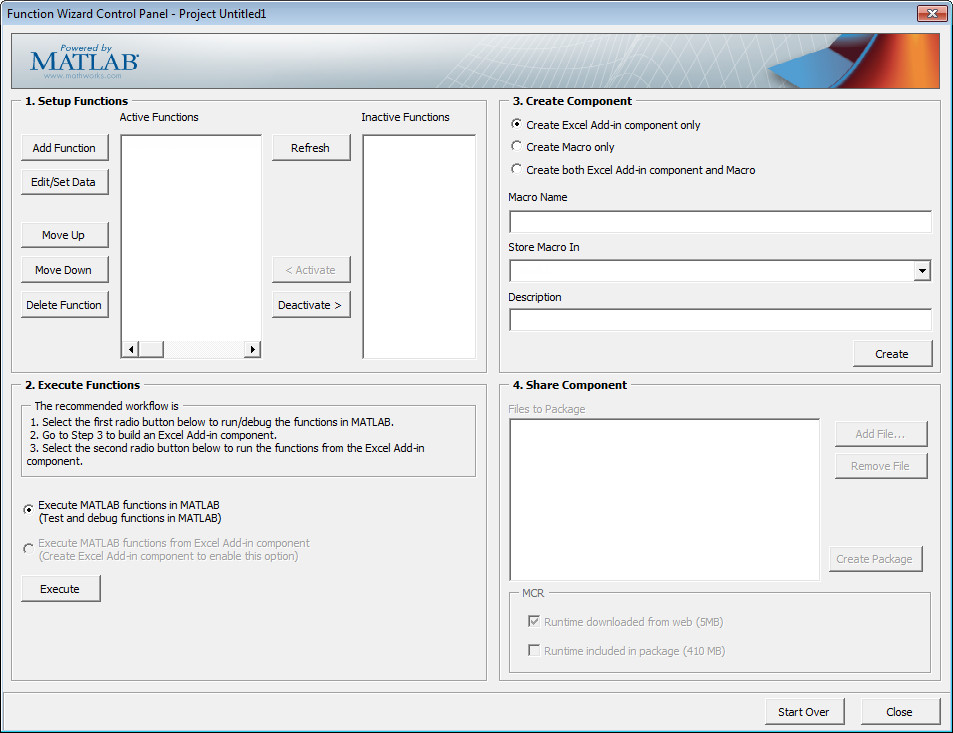
Class1) and to assign a Version number for source control purposes.Click OK. The Function Wizard Control Panel displays with the Add Function button enabled.
About Project Files
Keep in mind the following information about project files when working with the Function Wizard:
The project files created by the Function Wizard are the same project files created and used by the Deployment Tool (
deploytool).The Function Wizard prompts you to specify a location for your project files when you open your first new project. Project files are auto-saved to this location and may be opened in the future through either the Deployment Tool or the Function Wizard.
If you previously built a component using the Function Wizard, the wizard will prompt you to load it.
Quitting the MATLAB Session Invoked by the Function Wizard
Avoid manually terminating the MATLAB session invoked by the Function Wizard. Doing so can prevent you from using the Wizard's MATLAB-related features from your Excel session. If you want to quit the remotely invoked MATLAB session, restart Excel.
New MATLAB Function Definition
Add the function you want to deploy to the Function Wizard. Click Add in the Set Up Functions area of the Function Wizard Control Panel. The New MATLAB Function dialog box appears.
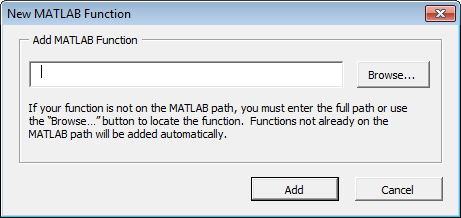
Browse to locate your MATLAB function. Select the function and click Open.
In the New MATLAB Function dialog box, click Add. The Function Properties dialog box appears.
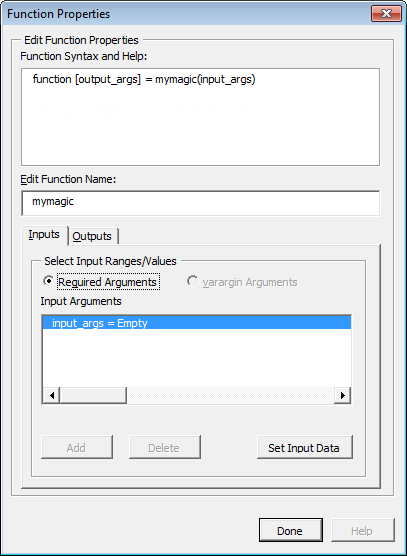
Tip The Function Syntax and Help area, in the Function Properties dialog box, displays the first help text line (sometimes called the H1 line) in a MATLAB function. Displaying these comments in the Function Properties dialog box can be helpful when deploying new or unfamiliar MATLAB functions to end-users.
Define input argument properties as follows.
On the Input tab, click Set Input Data. The Input Data for
ndialog box appears.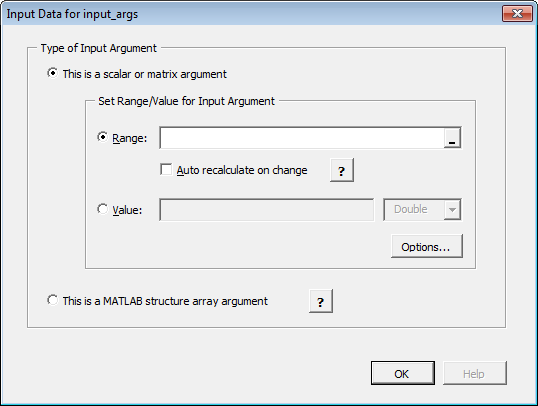
Specify a Range or Value by selecting the appropriate option and entering the value.
Caution Avoid selecting ranges using arrow keys. If you must use arrow keys to select ranges, apply the necessary fix from the Microsoft site: http://support.microsoft.com/kb/291110.
Click Done.
Tip To specify how MATLAB Compiler for Excel add-ins handles blank cells (or cells containing no data), see Empty Cell Value Control.
Define output argument properties as follows.
On the Output tab, click Set Output Data. The Output Data for
ydialog box appears, wherexis the name of the output variable you are defining properties of.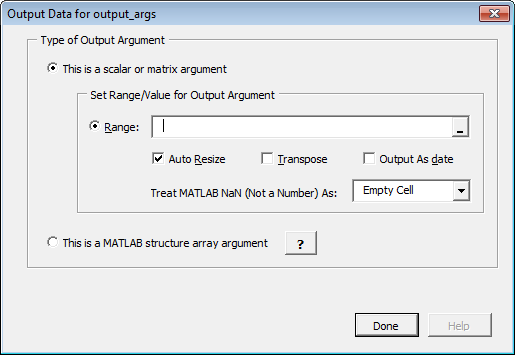
Tip You can also specify MATLAB Compiler to Auto Resize, Transpose or output your data in date format (Output as date). To do so, select the appropriate option in the Argument Properties For
ydialog box.Specify a Range. Alternately, select a range of cells on your Excel sheet; the range will be entered for you in the Range field.
Caution Avoid selecting ranges using arrow keys. If you must use arrow keys to select ranges, apply the necessary fix from the Microsoft site: http://support.microsoft.com/kb/291110.
Select Auto Resize if it is not already selected.
Click Done in the Argument Properties For
ydialog box.Click Done in the Function Properties dialog box.
mymagicnow appears in the Active Functions list of the Function Wizard Control Panel.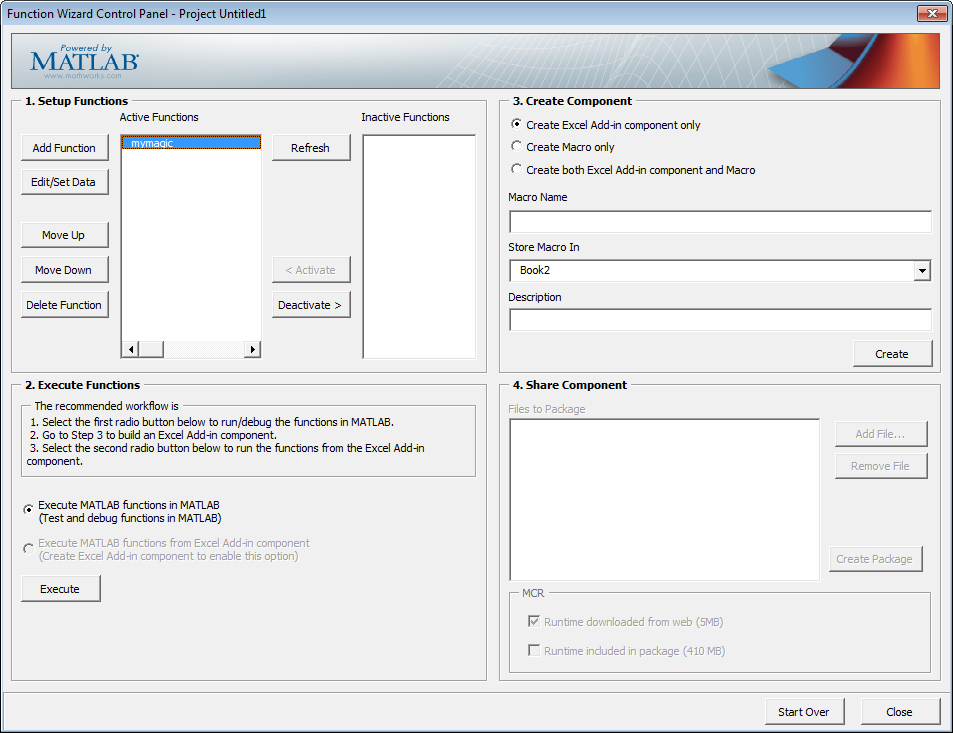
Empty Cell Value Control
You can specify how MATLAB Compiler processes empty cells,
allowing you to assign undefined or unrepresented (NaN,
for example) data values to them.
To specify how to handle empty cells, do the following.
Click Options in the Input Data for
Ndialog box.The Input Conversion Options dialog box opens.
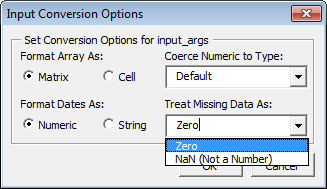
Click the Treat Missing Data As drop-down box.
Specify either Zero or NaN (Not a Number), depending on how you want to handle empty cells.
Working with Struct Arrays
To assign ranges to fields in a struct array, do the following:
If you have not already done so, select This is a MATLAB structure array argument in the Input Data for
ndialog box and click OK.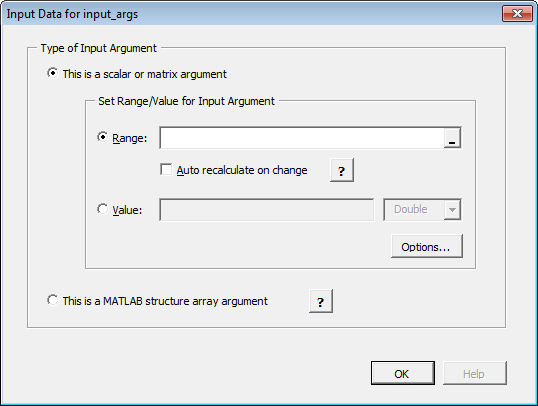
The Input Data for Structure Array Argument
ndialog box opens.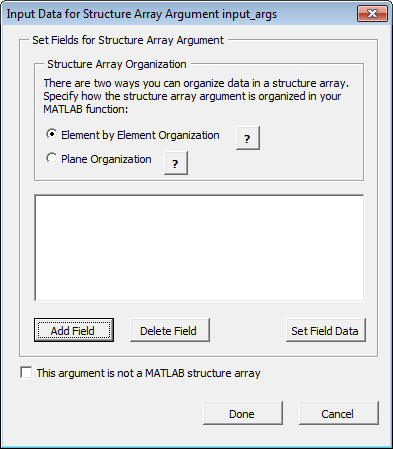
The Function Wizard supports Vector and Two-dimensional struct arrays organized in either Element by Element or Plane organization, for both input and output.
In the Input Data for Structure Array Argument
ndialog box, do the following:In the Structure Array Organization area, select either Element by Element Organization or Plane Organization.
Click Add Field to add fields for each of your struct array arguments. The Field for Structure Array Argument dialog box opens.
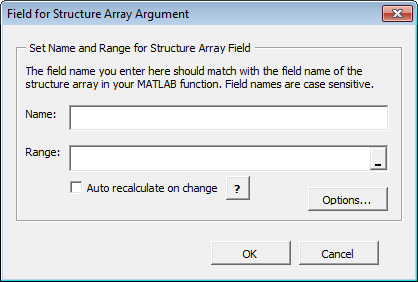
In the Field for Argument dialog box, do the following:
In the Name field, define the field name. The Name you specify must match the field name of the structure array in your MATLAB function.
Specify the Range for the field.
Caution Avoid selecting ranges using arrow keys. If you must use arrow keys to select ranges, apply the necessary fix from the Microsoft site: http://support.microsoft.com/kb/291110.
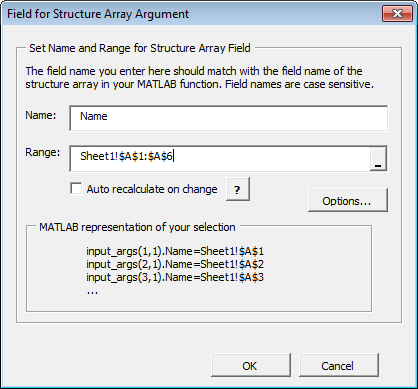
Click Done.
How Structure Arrays are Supported. MATLAB Compiler supports one and two-dimensional MATLAB structure arrays.
The product converts data passed into structure arrays in element-by-element organization or plane organization. See MATLAB Programming Fundamentals for more information about all MATLAB data types, including structures.
Deploying Structure Arrays as Inputs and Outputs. If you are a MATLAB programmer and want to deploy a MATLAB function with structure arrays as input or output arguments, build Microsoft Excel macros using the Function Wizard and pass them (with the Excel add-in and COM component) to the end users. If you can't do this, let your end users know:
Which arguments are structure arrays
Field names of the structure arrays
Using Macros with Struct Arrays. The macro generation feature of MATLAB Compiler for Excel add-ins works with struct arrays as input or output arguments. See Macro Creation if you have a MATLAB function you are ready to deploy. See Microsoft Excel Add-In and Macro Creation Using the Function Wizard if you are using the Function Wizard to create your MATLAB function from scratch. See Choosing Function Deployment Workflow for more information on both workflows.
MATLAB Function Prototyping and Debugging
Use the Function Wizard to interactively prototype and debug a MATLAB function.
Since mymagic calls the prewritten MATLAB magic function
directly, it does not provide an illustrative example of how to use
the prototyping and debugging feature of MATLAB Compiler.
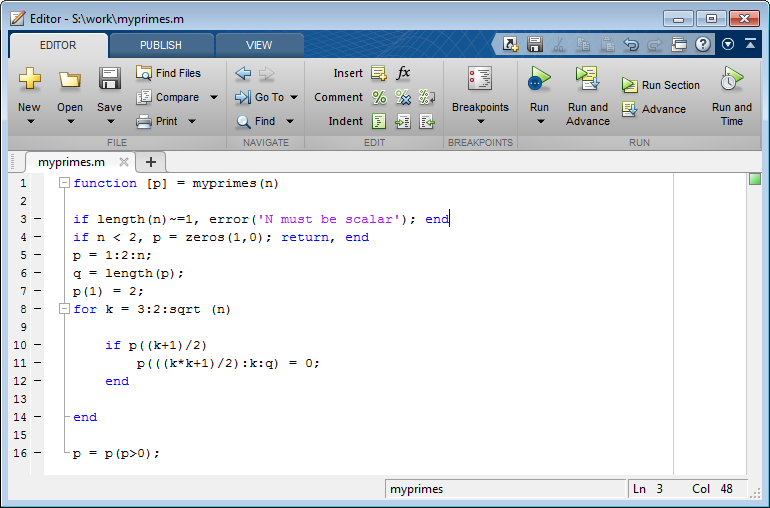
Following is an example of how you might use this feature with myprimes,
a function containing multiple lines of code.
Prototyping and Debugging with myprimes
For example, say you are in the process of prototyping code
that uses the equation P = myprimes(n). This equation
returns a row vector of prime numbers less than or equal to n (a
prime number has no factors other than 1 and the number itself).
Your code uses P = myprimes(n) as follows:
function [p] = myprimes(n)

if length(n)~=1, error('N must be a scalar'); end
if n < 2, p = zeros(1,0); return, end
p = 1:2:n;
q = length(p);
p(1) = 2;
for k = 3:2:sqrt(n)

  if p((k+1)/2)
     p(((k*k+1)/2):k:q) = 0;
  end

end

p = (p(p>0));
In designing your code, you want to handle various use cases.
For example, you want to experiment with scenarios that may assign
a column vector value to the output variable p (
(myprimes only returns a row vector, as stated
previously). You follow this general workflow:
Set a breakpoint in
myprimesat the firstifstatement, using the GUI ordbstop, for instance.On the Function Wizard Control Panel, in the Execute Functions area, click Execute. Execution will stop at the previously set breakpoint. Note the value of
pin the yellow box in the following figure. Step-through and debug your code as you normally would using the MATLAB Editor.Debugging myprimes Using the Function Wizard
For more information about debugging MATLAB code, see "Editing and Debugging MATLAB Code" in the MATLAB Desktop Tools and Development Environment User's Guide.
Function Execution from MATLAB
Test your deployable MATLAB function by executing it in MATLAB:
From the Function Wizard Control Panel, in the Execute Functions area, select Execute MATLAB Functions in MATLAB.
Click Execute. In Excel, the Magic Square function executes, producing results similar to the following.
Microsoft Excel Add-In and Macro Creation Using the Function Wizard
The Function Wizard can automatically create a deployable Microsoft Excel add-in and macro. To create your add-in in this manner, use one of the following procedures.
Creating an Add-In and Associated Excel Macro
To create both a deployable add-in and an associated Excel macro:
In the Function Wizard Control Panel dialog box, in the Create Component area, select Create Both Excel Add-in Component and Excel Macro.
Enter
mymagicin the Macro Name field.Select the location of where to store the macro, using the Store Macro In drop-down box.
Enter a brief description of the macro's functionality in the Description field.
Click Create to build both the add-in (as well as the underlying COM component) and the associated macro. The Deployment Tool Build dialog box appears, indicating the status of the add-in and COM component compilation (build).
The Build Dialog

Creating a COM Component or a Macro Only Without Creating an Add-In
To create either a COM component or a macro without also creating the Excel add-in, do the following
In the Function Wizard Control Panel dialog box, in the Create Component area, select either MATLAB Excel Add-in Component Only or Create Excel Macro Only.
Enter
mymagicin the Macro Name field.Select the location of where to store the macro, using the Store Macro In drop-down box.
Enter a brief description of the macro's functionality in the Description field.
Click Create.
Function Execution from the Deployed Component
Execute your function as you did similarly in Function Execution from MATLAB, but this time execute it from the deployed component to ensure it matches your previous output.
From the Function Wizard Control Panel, in the Execute Functions area, select Execute MATLAB Functions from Deployed Component.
Click Execute. In Excel, the Magic Square function executes, producing results similar to the following.

Macro Execution
Run the macro you created in Macro Creation by doing one of the following, after first
clearing cells A1:E5 (which contain the output
of the Magic Square function you ran in Function Execution).
Tip You may need to enable the proper security settings before running macros in Microsoft Excel. For information about macro permissions and error messages occuring from executing macros, see the Troubleshooting appendix. |
Using Office 2007 or Office 2010 or 2013
In Microsoft Excel, click View > Macros > View Macros.
Select
mymagicfrom the Macro name drop-down box.Click Run. Cells
A1:E5on the Excel sheet are automatically populated with the output ofmymagic.
Using Office 2003
In Microsoft Excel, click Tools > Macro > Macros.
Select
mymagicfrom the Macro name drop-down box.Click Run. Cells
A1:E5on the Excel sheet are automatically populated with the output ofmymagic.
Microsoft Excel Add-In and Macro Packaging using the Function Wizard
The Function Wizard can automatically package a deployable Microsoft Excel add-in and macro for sharing. To package your add-in in this manner, use one of the following procedures.
After successfully building your component and add-in, in the Share Component area of the Function Wizard Control Panel dialog box, review the files listed in the Files to include in packaging field. Add Files or Remove Files to and from the package by clicking the appropriate buttons.
To add access to the MATLAB Runtime installer to your package, select one of the options in the MATLAB Runtime area. For information about the MATLAB Runtime and the MATLAB Runtime installer, see Install the MATLAB Runtime.
When you are ready to create your package, click Create Package.
Microsoft Visual Basic Code Access (Optional Advanced Task)
Optionally, you may want to access the Visual Basic code or modify it, depending on your programming expertise or the availability of an Excel developer. If so, follow these steps.
From the Excel main window, open the Microsoft Visual Basic editor by doing one of the following. select Tools > Macro > Visual Basic Editor.
Using Office 2007 or Office 2010 or 2013
Click Developer > Visual Basic.
When the Visual Basic Editor opens, in the Project - VBAProject window, double-click to expand
VBAProject (mymagic.xls).Expand the
Modulesfolder and double-click theMatlab Macrosmodule.This opens the Visual Basic Code window with the code for this project.
Using Office 2003
Click Tools > Macro > Visual Basic Editor.
When the Visual Basic Editor opens, in the Project - VBAProject window, double-click to expand
VBAProject (mymagic.xls).Expand the
Modulesfolder and double-click theMatlab Macrosmodule.This opens the VB Code window with the code for this project.
Mapping a Macro to a GUI Button or Control (Optional)
To attach the macro to a GUI button, do the following:
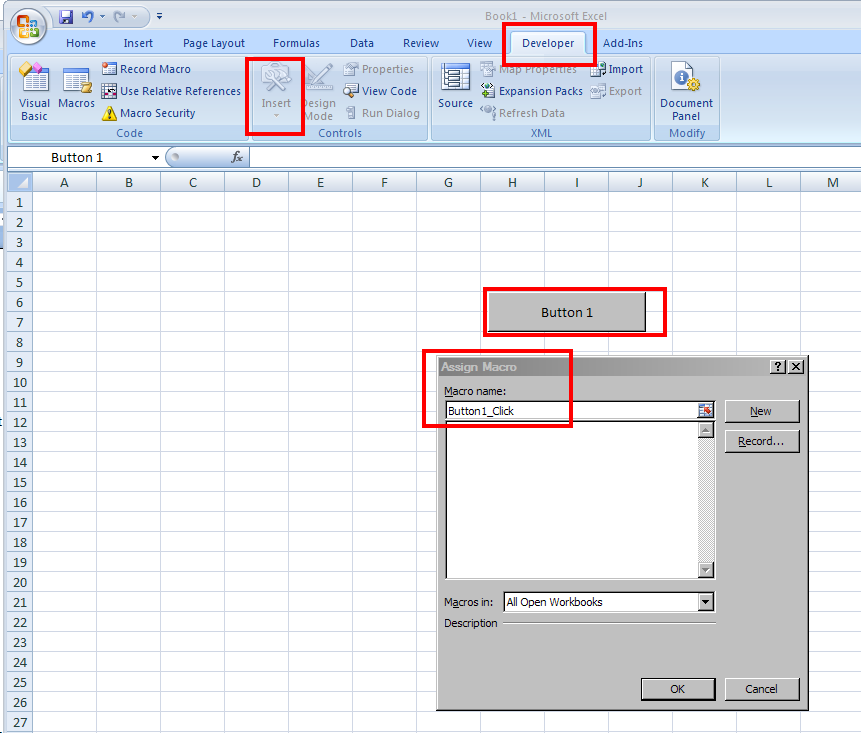
Click Developer > Insert.
From the Form Controls menu, select the Button (Form Control) icon.
Tip Hover your mouse over the Form Controls menu to see the various control labels.
In the Assign Macros dialog box, select the macro you want to assign the GUI button to, and click OK.
Attaching a Macro to a Button
For More Information
| If you want to... | See... |
|---|---|
| Write Deployable MATLAB Code |
| See more examples about building add-ins and COM components | Create Macros from MATLAB Functions |
| Learn more about the MATLAB Runtime | About the MATLAB Runtime |
| Learn how to customize and integrate the COM component you built by modifying the Microsoft Visual Basic code | Integrate Components using Visual Basic ApplicationBuild and Integrate Spectral Analysis Functions |